Godot is node based, as is Amazon Lumberyard successor O3DE. These engines are fundamentally different from Unity and Unreal because they are Node Based instead of using a Scene Manager. Unity and Unreal’s scene management works a lot like how you’d expect a game to work coming out of the 2000’s, distinct levels that load in and load out, these are scenes. They have distinct data for each scene, they were not originally meant to co-exist with other scenes. Now Unity and Unreal have patched in muti-scene capabilities that let you do exciting new things, but they are kind of bad imitations of Node Based engines.
Node based engines recognize that all the data in the game is essentially just data, and then give you controls over how that data is deployed in your game. That is radically different, but not nearly as complicated as it sounds at first. It’s actually much simpler to build with, instead of fighting a engines Scene Management system all the time, you just add the nodes you want and don’t have to worry that the engine will actively counteract your design goals.
Based on a year and half of developing in Godot, this is my preferred basic architecture for any project. The basics are almost always identical, but the later parts, like how you select levels and how levels themselves work changes game to game. And like most things in Godot, making those changes is extremely easy compared to its competitors.
Note that in Godot we call saved nodes scenes, so forget my little rant we’ve transcended the Unity/Unreal Scene BS this is a new engine with new concepts and a lot of repurposed terms. A scene can be a level, a player, an item. It’s close to, but not the same as, a prefab in Unity.
Scene Flow
From launch your game will do two things, it will run the Main Scene from Run in Project Settings, and it will load all of your autoloads (globals/signletons). You don’t want the Main Scene and an Autoload to be the same, make sure these are different.
My Main Scene is always a Splash Screens, they load in, display themselves and once the slideshow is done that scene entirely removes itself with queue_free().

At the same time, my Autoloads come in:
The Manager Scene, completely hidden by the splash screens comes first it will be the go to control for the entire game. I fill this scene with my Game Manager, Controls Manager, and any other managers I need. This scene also includes everything I want to have consistent control in my game: I have parent objects for the Player, the Stage(level); the game Camera and a PhantomCameraHost to allow my levels and characters to use virtual cameras; an AudioStreamPlayer to run all the music for the game; a master WorldEvironment with the basics setup; my global menus like Debug, Pause and Settings all under one parent control; and at the very base a Control parent with any transition screens as TextureRects, being at the bottom of the node tree means it will always obscure everything else in the game. Finally a small label showing the current Build version helps players when they fill in bug reports. All of that is permanent in my architecture, anything with a parent like the Transitions and Menus could be loaded and unloaded, but for the minimal performance cost I find it useful to always have them loaded and ready to show.
The EventsSystem script loads in, it just holds the events that the rest of the game will use to communicate with the game manager. I keep it entirely separate so it doesn’t get accidently messed with.
Once the splash screens have finished, an event is called to load the Main Menu scene, this is the first level or “stage” and it loads in the same way all my “stages” will. The Splash Screens scene runs self.queue_free() and we are officially in the game!
From now on everything will load through the Player Parent and Stage Parent. To do classic single level stuff, call a stage switching event that will clear the current stage and load the new one with a transition. To do large open worlds instantiate multiple stages to deliver exactly what you want. These are all just nodes, so a Stage can be 2D or 3D, it can even be UI Control nodes. You have complete freedom to define what data you want to use.
I setup a few different stages by default: a Main Menu Stage where the player chooses stuff, a Testing stage where I can test the things I’ve added to the game, an Intro stage for a cutscene or tutorial, something small that introduces the player to the game (this is optional I just like it), all the actual level stages, and a Credits stage.
If I have different player types I’ll set them up as semi-generic controllers, a Walking Character controller, a Flying Vehicle controller, and maybe some Driving Vehicle controllers. You do you!
Custom Resources
In Godot you can make Custom Resources really easily, these are little structures of data that you define.
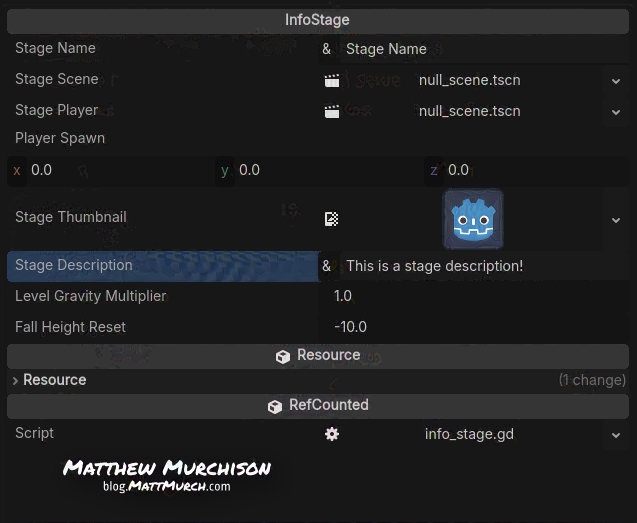
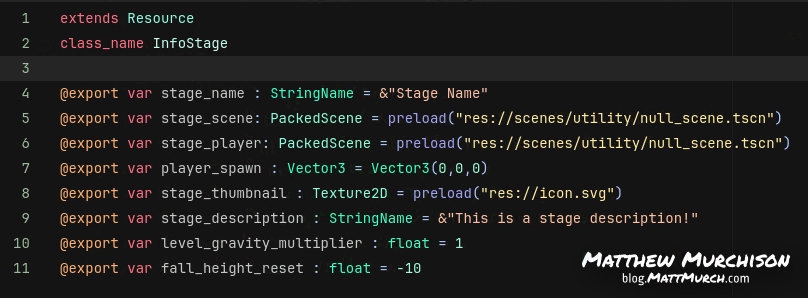
Above you’ve probably noticed that I have Stages which I use for any environment that the player uses (walk around a level, scroll through the credits, click through the main menu). I keep track of these with a StageInfo resource, it holds info like the stage name, the difficulty rating, a screenshot of the stage. It also holds loading info though, the actual path to insatiate the Scene nodes, the exact location of the player spawn.
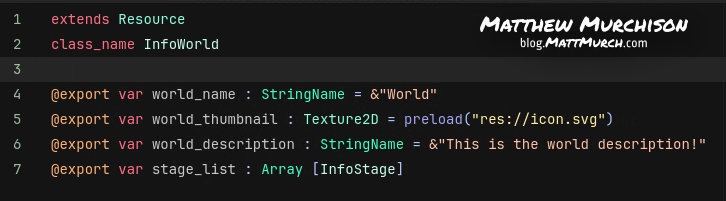
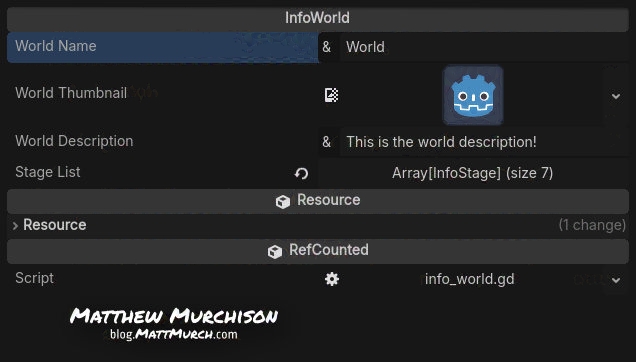
I have another resource, borrowed form Maddi over at There-May-Be.Art called a World Definition, this lets me setup little sets of levels, like worlds in Super Mario. It has a world name, world difficulty, world image, and an array of all the StageInfo resources for the Stages in this world
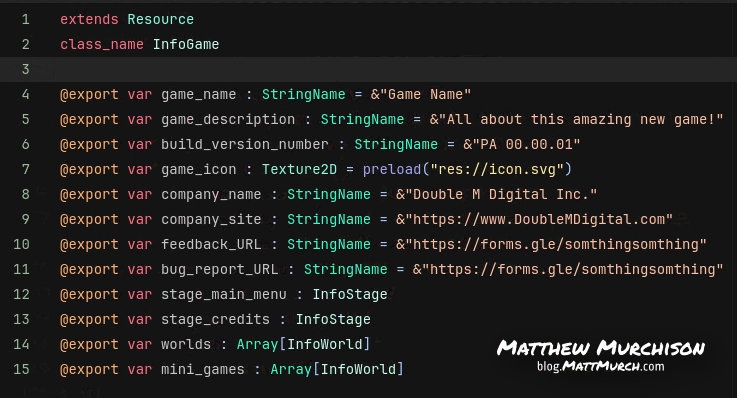
Maddi also let me borrow her concept for an overall GameInfo resource, mine has the game name, description, build version, icon, company name and copyright info, the site for the game and company, URLs for feedback and bug reporting forms. Finally it takes a Main Menu StageInfo, a Credits StageInfo, an array of WorldInfo resources, and sometimes a minigames WorldInfo.

With those three resources GameInfo > WorldInfo > StageInfo you have coordinated the entirety of your game into one easy to access place.
I use a few different GameInfos, the Full Game GameInfo, a Demo GameInfo, and a testing GameInfo.
Now your menu can write itself, and your projects description can always be up to date for any build you make.
Using it all
With a good set of scenes and the right resources your game will be easy to maintain and feel professional even what it’s just a simple prototype. I use this setup for every game I’ve made in Godot so far.
The more you use whatever your version of this looks like, the more you can refine it, add new resources and features, take out stuff I do that you don’t need or don’t like using.